

|
Why all real estate agents should only recommend InterNACHI® inspectors
InterNACHI® is so sure of its inspectors that it will indemnify any licensed real estate agent in an amount up to $10,000 if a third party successfully sues the agent for negligent referral of an InterNACHI® inspector. This protection is offered at no cost to agents who register. This is how the program works:
REGISTER NOW for InterNACHI's Free Negligent Referral Protection Plan ...and never refer your clients to anyone less than an InterNACHI inspector. by Nick Gromicko, CMI®
Solar energy offers considerable advantages over conventional energy systems by nullifying flaws in those systems long considered to be unchangeable. Solar power for home energy production has its flaws, too, which are outlined in another article, but they're dwarfed by the advantages listed below. The following are advantages of solar energy:
In summary, solar energy offers advantages to conventional fossil fuels and other renewable energy systems. by Nick Gromicko, CMI® Purchasing foreclosed homes in desirable areas at below-market values can be a sound investment strategy. Appreciation on their original prices may be tax-free. Buying foreclosed rental properties can provide positive cash flow, as well as valuable tax deductions. On the other hand, buying a foreclosure involves homework, patience, and a certain amount of luck. For those wishing to get a bargain house through the foreclosure process, it’s best to learn the basics. Four Ways to Buy a Foreclosed Home
Tips for Foreclosure Purchases
by Nick Gromicko, CMI® and Kate Tarasenko A barn is an agricultural building, typically located on a ranch or farm (or former ranch or farm), and used for a variety of purposes, including:
Inspectors who work in rural areas may be asked to inspect a barn, but, before they do, they should consider the following two questions:
Personal Protection Equipment While inspecting barns, inspectors should wear the appropriate personal protection equipment (PPE), including boots, gloves and respirators, especially if the structures are older or poorly ventilated. Some inspectors are surprised by how dirty barn air can be, reporting that one can almost taste ammonia or dust in the air. These may be the result of lingering animal waste, a failure to properly clean and maintain the interior of the structure, and/or a failure to make repairs to the structure itself. Hazards to Look For In and around the barn, inspectors can look for the following issues:
Barns contain both natural and man-made flammables. For this reason, barn fires can be devastating and get out of control in a few seconds, especially if the property is located far away from first-responders. Some of these fire hazards include:
Inspectors can recommend that owners exercise the following precautions to ensure a safe barn area for both people and animals:
10 Easy Ways to Save Money & Energy in Your Homeby Nick Gromicko, CMI®, Ben Gromicko, and Kenton Shepard
Many people don’t know how easy it is to make their homes run on less energy, and here at InterNACHI®, we want to change that. Drastic reductions in heating, cooling and electricity costs can be accomplished through very simple changes, most of which homeowners can do themselves. Of course, for homeowners who want to take advantage of the most up-to-date knowledge and systems in home energy efficiency, InterNACHI® energy auditors can perform in-depth testing to find the best energy solutions for your home. Why make your home more energy-efficient? Here are a few good reasons:
As much as half of the energy used in homes goes toward heating and cooling. The following are a few ways that energy bills can be reduced through adjustments to the heating and cooling systems:
2. Install a tankless water heater. Demand-type water heaters (tankless or instantaneous) provide hot water only as it is needed. They don't produce the standby energy losses associated with traditional storage water heaters, which will save on energy costs. Tankless water heaters heat water directly without the use of a storage tank. When a hot water tap is turned on, cold water travels through a pipe into the unit. A gas burner or an electric element heats the water. As a result, demand water heaters deliver a constant supply of hot water. You don't need to wait for a storage tank to fill up with enough hot water. 3. Replace incandescent light bulbs. The average household dedicates 11% of its energy budget to lighting. Traditional incandescent light bulbs convert only about 10% of the energy they consume into light, while the rest becomes heat. The use of new lighting technologies, such as light-emitting diodes (LEDs) and compact fluorescent lamps (CFLs), can reduce the energy use required by lighting by 50% to 75%. Advances in lighting controls offer further energy savings by reducing the amount of time that lights are on but not being used. Here are some facts about CFLs and LEDs:
Sealing and insulating your home is one of the most cost-effective ways to make a home more comfortable and energy-efficient, and you can do it yourself. A tightly sealed home can improve comfort and indoor air quality while reducing utility bills. An InterNACHI® energy auditor can assess leakage in the building envelope and recommend fixes that will dramatically increase comfort and energy savings. The following are some common places where leakage may occur:
The following systems can be installed to conserve water usage in your home:
Appliances and electronics account for about 20% of household energy bills in a typical U.S. home. The following are tips that will reduce the required energy of electronics and appliances:
Daylighting is a way to draw in natural light from outside to illuminate the home's interior. It can be achieved using the following approaches:
About one-third of the home's total heat loss usually occurs through windows and doors. The following are ways to reduce energy lost through windows and doors:
An enormous amount of energy is wasted while cooking. The following recommendations and statistics illustrate less wasteful ways of cooking:
 by Nick Gromicko, CMI® and Kenton Shepard
There are a number of measures that homeowners can take to ensure that their homes are not attractive to burglars. If clients are concerned about break-ins, inspectors can pass on to them basic strategies for burglar-proofing their homes. Some interesting statistics concerning break-ins in the United States:
According to a survey, burglars enter homes through the following locations:
Some interesting statistics (2002) concerning break-ins in Canada:
In summary, there are a number of tactics that inspectors can pass on to their clients that will help safeguard their homes from break-ins. As a homeowner, you know that cooler temperatures bring changes to your home and, consequently, your heating bill. Learn how to winterize your house to protect it from the elements and trim your winter heating costs. The best time to start winterizing is before winter weather arrives. A broken furnace or freezing pipes are doubly daunting when you’re dealing with cold or snow. Take these steps to prepare the inside and outside of your home for a warm and comfortable winter season. As an added benefit, many of these home winterization changes can help you save energy and reduce your winter heating bill. 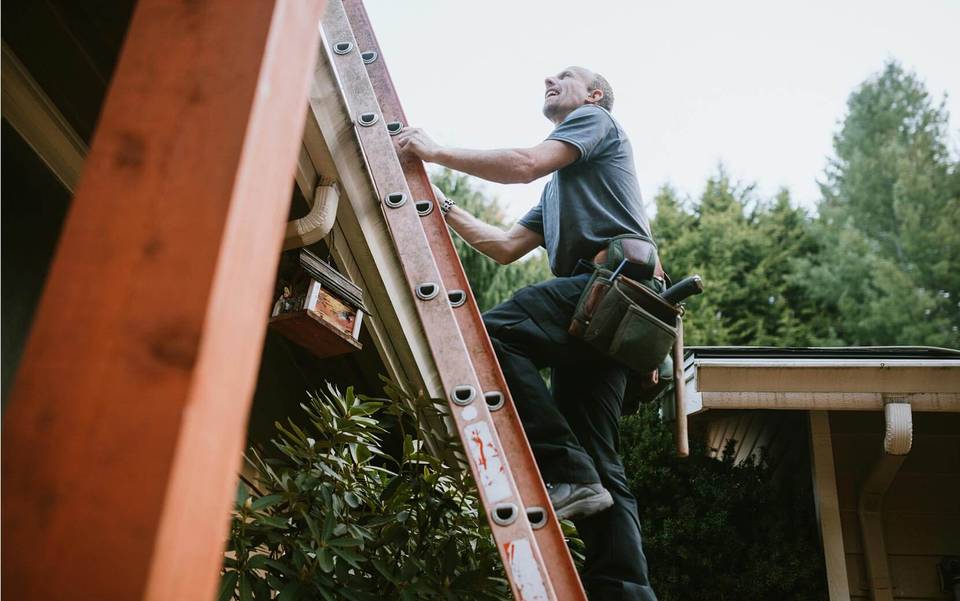 Winterize your home sooner rather than later to avoid doing outdoor work in cold weather. While it seems like a lot of work to prepare your house for winter, taking the right measures ahead of time can save you a lot of stress and money later on.
Insulate your pipes Even if you don’t live in an area prone to freezing temperatures, the occasional cold front can threaten your pipe systems. Exposed pipes — like those in your attic or garage — are especially at risk and may require special insulation. You can purchase “pipe sleeves” or even use newspaper for a short term fix to help prevent pipes from freezing or bursting. Other less-eco-friendly solutions include allowing water to drip during cold snaps or heating uninsulated areas. Weatherproof doors and windows Cracks around windows and doors can allow warm air to escape and cooler air to enter your home. Luckily, there are a few ways to reduce the amount of cool air that enters via your windows. You can either purchase energy-efficient window coverings or drapes to reduce the draft or install insulating films to your window frames. Also try sealing windows and doors with caulking or weather-proof strips to prevent leaks. Larger investments include installing double-pane windows to increase energy efficiency. Inspect your roof and gutters Schedule a roof inspection ahead of time or safely check it out yourself to look for any problem areas. Missing shingles or clogged gutters may leave you vulnerable to damage during winter weather months from leaks or the weight of snow. Switch to LED lights If you plan on stringing up holiday lights outdoors, look into using energy-efficient LED lights to help reduce your energy bill. LED lights are longer-lasting, safer and more durable than regular incandescent glass bulbs, meaning they should withstand the elements better. Consider using these lights indoors on your holiday tree or as recess lighting in your home. Disconnect hoses and sprinkler systems Winterize your sprinkler system by shutting off the water supply before freezing temperatures arrive. Drain the pipes to help prevent them from freezing during cold snaps. Disconnect any outside hoses from the spout and shut off water to those sources. If you have a pool or outdoor water feature, take steps to drain and protect them as well. Protect your plants If temperatures drop below 45 degrees, bring small plants indoors. For larger plants and trees, take extra steps to protect them during cooler weather. Wrap tree trunks with protective paper wrapping to prevent freezing and add mulch around plants to help regulate the temperature. For light freezes, cover outdoor plants with blankets overnight to protect them. Just be sure to remove blankets first thing in the morning to prevent condensation build-up. Move outdoor equipment inside Protect your outdoor furniture and appliances by moving them into your garage or basement, if possible. Clean and disconnect your gas grills before moving them inside so that they are stored safely. This should also help prevent wildlife from nesting inside your appliances. If storing furniture and grills inside isn’t an option, purchase covers to protect them outdoors. Winterize the inside of your home Before you pull out the box of holiday decorations, take some time to make simple changes inside your home to prepare for winter weather. Many of these changes will also reduce your energy bill and cut costs in surprising ways. Test your thermostat and heating system Schedule your furnace or heating system to be serviced before the winter season. Replace your filter monthly to reduce energy costs and keep your system running smoothly. Consider installing a new programmable thermostat to allow you to adjust or schedule temperatures and save on your energy bill. Reverse your ceiling fans A simple way to reduce heating costs and energy use is to let your ceiling fans do the work. In winter months, set them to rotate in a clockwise direction to spread warm air near the ceiling down into the room. Open the curtains of south-facing windows During the day, let the sunshine and heat in from doors and windows on the south side of your house. This is a natural way to heat your home using daylight, meaning your heating system won’t have to work as hard. At night, close the blinds or curtains to limit any draft that may come through. Turn down the thermostat This may be bad news for people who prefer warmer temperatures indoors, but keeping it cooler in your home during the winter months can trim your heating costs. Adjusting the thermostat down by 10 to 15 degrees for eight hours — while you’re at work, for instance — can save around 10% on your heating and cooling bills annually. While you’re at home, try to decrease the temperature to a point where you and your family are comfortable and rely on blankets for extra warmth. Seal your fireplace Fireplaces provide another route for cool air to get inside your home. For safety, have your chimney and fireplace inspected and cleaned before you start using them regularly. When you aren’t using your fireplace, keep the damper closed to keep warm air from escaping. Install glass doors around the fireplace opening to reduce heat loss and keep cool air out. You may also want to caulk around the hearth to seal up any leaks. Lower your water heater temperature One of the easiest ways to reduce your energy bill is lowering the temperature on your water heater. In fact, water heating accounts for 18% of your home’s energy use. Lower the temperature or use a water heater blanket to reduce your energy bill. Purchase winter storm essentials Prepare for any winter weather emergencies by stocking up on snow shovels, batteries, cases of water and non-perishable food. Candles and flashlights are also good items to keep on hand in case you need to use them. Schedule your annual home inspection to help prevent problem areas in your home that can cost you additional hassle and financial strain. 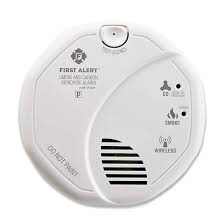 Carbon monoxide (CO) is a colorless, odorless, poisonous gas that forms from incomplete combustion of fuels, such as natural or liquefied petroleum gas, oil, wood or coal. Facts and Figures
When CO is inhaled, it displaces the oxygen that would ordinarily bind with hemoglobin, a process the effectively suffocates the body. CO can poison slowly over a period of several hours, even in low concentrations. Sensitive organs, such as the brain, heart and lungs, suffer the most from a lack of oxygen. High concentrations of carbon monoxide can kill in less than five minutes. At low concentrations, it will require a longer period of time to affect the body. Exceeding the EPA concentration of 9 parts per million (ppm) for more than eight hours may have adverse health affects. The limit of CO exposure for healthy workers, as prescribed by the U.S. Occupational Health and Safety Administration, is 50 ppm. Potential Sources of Carbon Monoxide Any fuel-burning appliances which are malfunctioning or improperly installed can be a source of CO, such as:
CO Detector Placement CO detectors can monitor exposure levels, but do not place them:
How can I prevent CO poisoning?
by Nick Gromicko, CMI®  15 Tools Every Homeowner Should Own by Nick Gromicko, CMI® and Ben Gromicko
The following items are essential tools, but this list is by no means exhaustive. Feel free to ask an InterNACHI inspector during your next inspection about other tools that you might find useful. 1. Plunger A clogged sink or toilet is one of the most inconvenient household problems that you will face. With a plunger on hand, however, you can usually remedy these plumbing issues relatively quickly. It is best to have two plungers -- one for the sink and one for the toilet. 2. Combination Wrench Set One end of a combination wrench set is open and the other end is a closed loop. Nuts and bolts are manufactured in standard and metric sizes, and because both varieties are widely used, you’ll need both sets of wrenches. For the most control and leverage, always pull the wrench toward you, instead of pushing on it. Also, avoid over-tightening. 3. Slip-Joint Pliers Use slip-joint pliers to grab hold of a nail, a nut, a bolt, and much more. These types of pliers are versatile because of the jaws, which feature both flat and curved areas for gripping many types of objects. There is also a built-in slip-joint, which allows the user to quickly adjust the jaw size to suit most tasks. 4. Adjustable Wrench Adjustable wrenches are somewhat awkward to use and can damage a bolt or nut if they are not handled properly. However, adjustable wrenches are ideal for situations where you need two wrenches of the same size. Screw the jaws all the way closed to avoid damaging the bolt or nut. 5. Caulking Gun Caulking is the process of sealing up cracks and gaps in various structures and certain types of piping. Caulking can provide noise mitigation and thermal insulation, and control water penetration. Caulk should be applied only to areas that are clean and dry. 6. Flashlight None of the tools in this list is of any use if you cannot visually inspect the situation. The problem, and solution, are apparent only with a good flashlight. A traditional two-battery flashlight is usually sufficient, as larger flashlights may be too unwieldy. 7. Tape Measure Measuring house projects requires a tape measure -- not a ruler or a yardstick. Tape measures come in many lengths, although 25 feet is best. Measure everything at least twice to ensure accuracy. 8. Hacksaw A hacksaw is useful for cutting metal objects, such as pipes, bolts and brackets. Hacksaws look thin and flimsy, but they’ll easily cut through even the hardest of metals. Blades are replaceable, so focus your purchase on a quality hacksaw frame. 9. Torpedo Level Only a level can be used to determine if something, such as a shelf, appliance or picture, is correctly oriented. The torpedo-style level is unique because it not only shows when an object is perfectly horizontal or vertical, but it also has a gauge that shows when an object is at a 45-degree angle. The bubble in the viewfinder must be exactly in the middle -- not merely close. 10. Safety Glasses / Goggles For all tasks involving a hammer or a power tool, you should always wear safety glasses or goggles. They should also be worn while you mix chemicals. 11. Claw Hammer A good hammer is one of the most important tools you can own. Use it to drive and remove nails, to pry wood loose from the house, and in combination with other tools. They come in a variety of sizes, although a 16-ounce hammer is the best all-purpose choice. 12. Screwdriver Set It is best to have four screwdrivers: a small and large version of both a flathead and a Phillips-head screwdriver. Electrical screwdrivers are sometimes convenient, but they're no substitute. Manual screwdrivers can reach into more places and they are less likely to damage the screw. 13. Wire Cutters Wire cutters are pliers designed to cut wires and small nails. The side-cutting style (unlike the stronger end-cutting style) is handy, but not strong enough to cut small nails. 14. Respirator / Safety Mask While paints and other coatings are now manufactured to be less toxic (and lead-free) than in previous decades, most still contain dangerous chemicals, which is why you should wear a mask to avoid accidentally inhaling. A mask should also be worn when working in dusty and dirty environments. Disposable masks usually come in packs of 10 and should be thrown away after use. Full and half-face respirators can be used to prevent the inhalation of very fine particles that ordinary facemasks will not stop. 15. Duct Tape This tape is extremely strong and adaptable. Originally, it was widely used to make temporary repairs to many types of military equipment. Today, it’s one of the key items specified for home emergency kits because it is water-resistant and extremely sticky. |
AuthorWrite something about yourself. No need to be fancy, just an overview. Archives
May 2024
Categories |
 RSS Feed
|
Schedule Your Cincinnati Home Inspection
513-720-9100 |
Top Choice Home Inspectors
|