by Nick Gromicko, CMI® and Kenton Shepard There are a number of measures that homeowners can take to ensure that their homes are not attractive to burglars. If clients are concerned about break-ins, inspectors can pass on to them basic strategies for burglar-proofing their homes. Some interesting statistics concerning break-ins in the United States:
According to a survey, burglars enter homes through the following locations:
Some interesting statistics (2002) concerning break-ins in Canada:
In summary, there are a number of tactics that inspectors can pass on to their clients that will help safeguard their homes from break-ins.
0 Comments
As a homeowner, you know that cooler temperatures bring changes to your home and, consequently, your heating bill. Learn how to winterize your house to protect it from the elements and trim your winter heating costs. The best time to start winterizing is before winter weather arrives. A broken furnace or freezing pipes are doubly daunting when you’re dealing with cold or snow. Take these steps to prepare the inside and outside of your home for a warm and comfortable winter season. As an added benefit, many of these home winterization changes can help you save energy and reduce your winter heating bill. Winterize your home sooner rather than later to avoid doing outdoor work in cold weather. While it seems like a lot of work to prepare your house for winter, taking the right measures ahead of time can save you a lot of stress and money later on.
Insulate your pipes Even if you don’t live in an area prone to freezing temperatures, the occasional cold front can threaten your pipe systems. Exposed pipes — like those in your attic or garage — are especially at risk and may require special insulation. You can purchase “pipe sleeves” or even use newspaper for a short term fix to help prevent pipes from freezing or bursting. Other less-eco-friendly solutions include allowing water to drip during cold snaps or heating uninsulated areas. Weatherproof doors and windows Cracks around windows and doors can allow warm air to escape and cooler air to enter your home. Luckily, there are a few ways to reduce the amount of cool air that enters via your windows. You can either purchase energy-efficient window coverings or drapes to reduce the draft or install insulating films to your window frames. Also try sealing windows and doors with caulking or weather-proof strips to prevent leaks. Larger investments include installing double-pane windows to increase energy efficiency. Inspect your roof and gutters Schedule a roof inspection ahead of time or safely check it out yourself to look for any problem areas. Missing shingles or clogged gutters may leave you vulnerable to damage during winter weather months from leaks or the weight of snow. Switch to LED lights If you plan on stringing up holiday lights outdoors, look into using energy-efficient LED lights to help reduce your energy bill. LED lights are longer-lasting, safer and more durable than regular incandescent glass bulbs, meaning they should withstand the elements better. Consider using these lights indoors on your holiday tree or as recess lighting in your home. Disconnect hoses and sprinkler systems Winterize your sprinkler system by shutting off the water supply before freezing temperatures arrive. Drain the pipes to help prevent them from freezing during cold snaps. Disconnect any outside hoses from the spout and shut off water to those sources. If you have a pool or outdoor water feature, take steps to drain and protect them as well. Protect your plants If temperatures drop below 45 degrees, bring small plants indoors. For larger plants and trees, take extra steps to protect them during cooler weather. Wrap tree trunks with protective paper wrapping to prevent freezing and add mulch around plants to help regulate the temperature. For light freezes, cover outdoor plants with blankets overnight to protect them. Just be sure to remove blankets first thing in the morning to prevent condensation build-up. Move outdoor equipment inside Protect your outdoor furniture and appliances by moving them into your garage or basement, if possible. Clean and disconnect your gas grills before moving them inside so that they are stored safely. This should also help prevent wildlife from nesting inside your appliances. If storing furniture and grills inside isn’t an option, purchase covers to protect them outdoors. Winterize the inside of your home Before you pull out the box of holiday decorations, take some time to make simple changes inside your home to prepare for winter weather. Many of these changes will also reduce your energy bill and cut costs in surprising ways. Test your thermostat and heating system Schedule your furnace or heating system to be serviced before the winter season. Replace your filter monthly to reduce energy costs and keep your system running smoothly. Consider installing a new programmable thermostat to allow you to adjust or schedule temperatures and save on your energy bill. Reverse your ceiling fans A simple way to reduce heating costs and energy use is to let your ceiling fans do the work. In winter months, set them to rotate in a clockwise direction to spread warm air near the ceiling down into the room. Open the curtains of south-facing windows During the day, let the sunshine and heat in from doors and windows on the south side of your house. This is a natural way to heat your home using daylight, meaning your heating system won’t have to work as hard. At night, close the blinds or curtains to limit any draft that may come through. Turn down the thermostat This may be bad news for people who prefer warmer temperatures indoors, but keeping it cooler in your home during the winter months can trim your heating costs. Adjusting the thermostat down by 10 to 15 degrees for eight hours — while you’re at work, for instance — can save around 10% on your heating and cooling bills annually. While you’re at home, try to decrease the temperature to a point where you and your family are comfortable and rely on blankets for extra warmth. Seal your fireplace Fireplaces provide another route for cool air to get inside your home. For safety, have your chimney and fireplace inspected and cleaned before you start using them regularly. When you aren’t using your fireplace, keep the damper closed to keep warm air from escaping. Install glass doors around the fireplace opening to reduce heat loss and keep cool air out. You may also want to caulk around the hearth to seal up any leaks. Lower your water heater temperature One of the easiest ways to reduce your energy bill is lowering the temperature on your water heater. In fact, water heating accounts for 18% of your home’s energy use. Lower the temperature or use a water heater blanket to reduce your energy bill. Purchase winter storm essentials Prepare for any winter weather emergencies by stocking up on snow shovels, batteries, cases of water and non-perishable food. Candles and flashlights are also good items to keep on hand in case you need to use them. Schedule your annual home inspection to help prevent problem areas in your home that can cost you additional hassle and financial strain. Carbon monoxide (CO) is a colorless, odorless, poisonous gas that forms from incomplete combustion of fuels, such as natural or liquefied petroleum gas, oil, wood or coal. Facts and Figures
When CO is inhaled, it displaces the oxygen that would ordinarily bind with hemoglobin, a process the effectively suffocates the body. CO can poison slowly over a period of several hours, even in low concentrations. Sensitive organs, such as the brain, heart and lungs, suffer the most from a lack of oxygen. High concentrations of carbon monoxide can kill in less than five minutes. At low concentrations, it will require a longer period of time to affect the body. Exceeding the EPA concentration of 9 parts per million (ppm) for more than eight hours may have adverse health affects. The limit of CO exposure for healthy workers, as prescribed by the U.S. Occupational Health and Safety Administration, is 50 ppm. Potential Sources of Carbon Monoxide Any fuel-burning appliances which are malfunctioning or improperly installed can be a source of CO, such as:
CO Detector Placement CO detectors can monitor exposure levels, but do not place them:
How can I prevent CO poisoning?
by Nick Gromicko, CMI® 15 Tools Every Homeowner Should Own by Nick Gromicko, CMI® and Ben Gromicko The following items are essential tools, but this list is by no means exhaustive. Feel free to ask an InterNACHI inspector during your next inspection about other tools that you might find useful. 1. Plunger A clogged sink or toilet is one of the most inconvenient household problems that you will face. With a plunger on hand, however, you can usually remedy these plumbing issues relatively quickly. It is best to have two plungers -- one for the sink and one for the toilet. 2. Combination Wrench Set One end of a combination wrench set is open and the other end is a closed loop. Nuts and bolts are manufactured in standard and metric sizes, and because both varieties are widely used, you’ll need both sets of wrenches. For the most control and leverage, always pull the wrench toward you, instead of pushing on it. Also, avoid over-tightening. 3. Slip-Joint Pliers Use slip-joint pliers to grab hold of a nail, a nut, a bolt, and much more. These types of pliers are versatile because of the jaws, which feature both flat and curved areas for gripping many types of objects. There is also a built-in slip-joint, which allows the user to quickly adjust the jaw size to suit most tasks. 4. Adjustable Wrench Adjustable wrenches are somewhat awkward to use and can damage a bolt or nut if they are not handled properly. However, adjustable wrenches are ideal for situations where you need two wrenches of the same size. Screw the jaws all the way closed to avoid damaging the bolt or nut. 5. Caulking Gun Caulking is the process of sealing up cracks and gaps in various structures and certain types of piping. Caulking can provide noise mitigation and thermal insulation, and control water penetration. Caulk should be applied only to areas that are clean and dry. 6. Flashlight None of the tools in this list is of any use if you cannot visually inspect the situation. The problem, and solution, are apparent only with a good flashlight. A traditional two-battery flashlight is usually sufficient, as larger flashlights may be too unwieldy. 7. Tape Measure Measuring house projects requires a tape measure -- not a ruler or a yardstick. Tape measures come in many lengths, although 25 feet is best. Measure everything at least twice to ensure accuracy. 8. Hacksaw A hacksaw is useful for cutting metal objects, such as pipes, bolts and brackets. Hacksaws look thin and flimsy, but they’ll easily cut through even the hardest of metals. Blades are replaceable, so focus your purchase on a quality hacksaw frame. 9. Torpedo Level Only a level can be used to determine if something, such as a shelf, appliance or picture, is correctly oriented. The torpedo-style level is unique because it not only shows when an object is perfectly horizontal or vertical, but it also has a gauge that shows when an object is at a 45-degree angle. The bubble in the viewfinder must be exactly in the middle -- not merely close. 10. Safety Glasses / Goggles For all tasks involving a hammer or a power tool, you should always wear safety glasses or goggles. They should also be worn while you mix chemicals. 11. Claw Hammer A good hammer is one of the most important tools you can own. Use it to drive and remove nails, to pry wood loose from the house, and in combination with other tools. They come in a variety of sizes, although a 16-ounce hammer is the best all-purpose choice. 12. Screwdriver Set It is best to have four screwdrivers: a small and large version of both a flathead and a Phillips-head screwdriver. Electrical screwdrivers are sometimes convenient, but they're no substitute. Manual screwdrivers can reach into more places and they are less likely to damage the screw. 13. Wire Cutters Wire cutters are pliers designed to cut wires and small nails. The side-cutting style (unlike the stronger end-cutting style) is handy, but not strong enough to cut small nails. 14. Respirator / Safety Mask While paints and other coatings are now manufactured to be less toxic (and lead-free) than in previous decades, most still contain dangerous chemicals, which is why you should wear a mask to avoid accidentally inhaling. A mask should also be worn when working in dusty and dirty environments. Disposable masks usually come in packs of 10 and should be thrown away after use. Full and half-face respirators can be used to prevent the inhalation of very fine particles that ordinary facemasks will not stop. 15. Duct Tape This tape is extremely strong and adaptable. Originally, it was widely used to make temporary repairs to many types of military equipment. Today, it’s one of the key items specified for home emergency kits because it is water-resistant and extremely sticky. Tree Swing Inspection by Nick Gromicko, CMI® and Kate Tarasenko A tree swing (or a rope swing or tire swing) is composed of a single rope or chain attached to a high tree branch, along with a seat, which is typically a wooden plank or tire. For many homeowners, tree swings represent fond childhood memories, but this type of DIY play equipment is too often poorly constructed by non-professional builders for their children, who can be unaware of the potential dangers. InterNACHI inspectors who encounter these at property exteriors may wish to alert their clients of some of the hazards they pose. Consider the following:
To prevent accidents, inspectors and their clients can learn about what goes into a properly installed tree swing, and how to inspect them for potential hazards. Tree Inspection A sturdy tree is a must for a safe tree swing, but this consideration may be overlooked on properties that lack a variety of healthy trees from which to choose. Also, inspectors should remember that while trees appear stationary, they are actually alive and constantly, albeit slowly, growing and changing shape. As such, branches will “absorb” hanger brackets, and overhead branches will become brittle, gradually transforming what was once a properly installed tree swing into one that is no longer safe to use. Check for the following indications that the tree will pose dangers to the user:
Ground Cover Whether on purpose or by accident, sooner or later, children will fall from playground equipment, including rope swings, and the extent of their injuries will be determined, in part, by the condition of the ground beneath the swing. Inspect for the following hazards that may make injuries more likely:
Tree swings are sometimes installed adjacent to ponds or rivers so the user has the option of a water landing. As exciting as this prospect may be, water presents its own set of dangers. A flotation device may be kept next to the tree so that it can be thrown into the water in case of an emergency. Also, check for the following:
A tree swing is only as strong as its rope or chain, so care should be taken to choose adequate material. Check for the following rope defects:
The seat should be high enough so that the user’s legs do not scrape the ground but not so high that the swing isn’t easily accessible or requires unsafe effort for the user to dismount. Remember that tree limbs can sway under the user’s weight, and weaker limbs might permit the seat to get too close to the ground. Sufficient clearance is roughly 10 inches between the ground and the user, which may translate into 16 inches for an unoccupied swing. A seat may be made from a wooden plank, which can be inspected for splinters, or a tire, which is usually suspended in a horizontal orientation using three suspension chains or cables connected to a single swivel mechanism that permits both rotation and a swinging motion in any axis. The tire may be a discarded vehicle tire or a plastic imitation, but it can present its own set of defects, including:
Hanger clamps provide a fixed point for the rope and the tree branch to intersect while keeping them properly separated, reducing friction on the rope than can cause it to gradually wear away. The likelihood of failure at this point is increased due to the additional stress of rotational movement and multiple users. Check for the following defects:
In summary, tree swings can be great fun if they’re used with safety in mind first and foremost. Use this guide to inspect for their proper installation and maintenance to prevent avoidable and potentially tragic accidents. Asbestos: Facts and Tips for Home Inspectors and Homeowners What Is Asbestos? Asbestos is a mineral fiber that can be positively identified only with a special type of microscope. There are several types of asbestos fibers. In the past, asbestos was added to a variety of products to strengthen them and to provide heat insulation and fire resistance. InterNACHI inspectors can supplement their knowledge with the information offered in this guide. How Can Asbestos Affect Human Health? From studies of people who were exposed to asbestos in factories and shipyards, we know that breathing high levels of asbestos fibers can lead to an increased risk of lung cancer in the forms of mesothelioma, which is a cancer of the lining of the chest and the abdominal cavity, and asbestosis, in which the lungs become scarred with fibrous tissue. The risk of lung cancer and mesothelioma increase with the number of fibers inhaled. The risk of lung cancer from inhaling asbestos fibers is also greater if you smoke. People who get asbestosis have usually been exposed to high levels of asbestos for a long time. The symptoms of these diseases do not usually appear until about 20 to 30 years after the first exposure to asbestos. Most people exposed to small amounts of asbestos, as we all are in our daily lives, do not develop these health problems. However, if disturbed, asbestos material may release asbestos fibers, which can be inhaled into the lungs. The fibers can remain there for a long time, increasing the risk of disease. Asbestos material that would crumble easily if handled, or that has been sawed, scraped, or sanded into a powder, is more likely to create a health hazard. Where Would Asbestos Be Found, and When Can it Be a Problem? Most products made today do not contain asbestos. Those few products made which still contain asbestos that could be inhaled are required to be labeled as such. However, until the 1970s, many types of building products and insulation materials used in homes contained asbestos. Common products that might have contained asbestos in the past, and conditions which may release fibers, include:
Where Asbestos Hazards May Be Found in a Home
If you think asbestos may be in your home, don't panic. Usually, the best thing to do is to leave asbestos material that is in good condition alone. Generally, material in good condition will not release asbestos fibers. There is no danger unless the asbestos is disturbed and fibers are released and then inhaled into the lungs. Check material regularly if you suspect it may contain asbestos. Don't touch it, but look for signs of wear or damage, such as tears, abrasions or water damage. Damaged material may release asbestos fibers. This is particularly true if you often disturb it by hitting, rubbing or handling it, or if it is exposed to extreme vibration or air flow. Sometimes, the best way to deal with slightly damaged material is to limit access to the area and not touch or disturb it. Discard damaged or worn asbestos gloves, stove-top pads and ironing board covers. Check with local health, environmental or other appropriate agencies to find out proper handling and disposal procedures. If asbestos material is more than slightly damaged, or if you are going to make changes in your home that might disturb it, repair or removal by a professional is needed. Before you have your house remodeled, find out whether asbestos materials are present. How to Identify Materials That Contain Asbestos You can't tell whether a material contains asbestos simply by looking at it, unless it is labeled. If in doubt, treat the material as if it contains asbestos, or have it sampled and analyzed by a qualified professional. A professional should take samples for analysis, since a professional knows what to look for, and because there may be an increased health risk if fibers are released. In fact, if done incorrectly, sampling can be more hazardous than leaving the material alone. Taking samples yourself is not recommended. If you nevertheless choose to take the samples yourself, take care not to release asbestos fibers into the air or onto yourself. Material that is in good condition and will not be disturbed (by remodeling, for example) should be left alone. Only material that is damaged or will be disturbed should be sampled. Anyone who samples asbestos-containing materials should have as much information as possible on the handling of asbestos before sampling and, at a minimum, should observe the following procedures:
How to Manage an Asbestos Problem If the asbestos material is in good shape and will not be disturbed, do nothing! If it is a problem, there are two types of corrections: repair and removal. Repair usually involves either sealing or covering asbestos material. Sealing (encapsulation) involves treating the material with a sealant that either binds the asbestos fibers together or coats the material so that fibers are not released. Pipe, furnace and boiler insulation can sometimes be repaired this way. This should be done only by a professional trained to handle asbestos safely. Covering (enclosure) involves placing something over or around the material that contains asbestos to prevent the release of fibers. Exposed insulated piping may be covered with a protective wrap or jacket. With any type of repair, the asbestos remains in place. Repair is usually cheaper than removal, but it may make removal of asbestos later (if found to be necessary) more difficult and costly. Repairs can either be major or minor. Major repairs must be done only by a professional trained in methods for safely handling asbestos. Minor repairs should also be done by professionals, since there is always a risk of exposure to fibers when asbestos is disturbed. Repairs Doing minor repairs yourself is not recommended, since improper handling of asbestos materials can create a hazard where none existed. If you nevertheless choose to do minor repairs, you should have as much information as possible on the handling of asbestos before doing anything. Contact your state or local health department or regional EPA office for information about asbestos training programs in your area. Your local school district may also have information about asbestos professionals and training programs for school buildings. Even if you have completed a training program, do not try anything more than minor repairs. Before undertaking minor repairs, carefully examine the area around the damage to make sure it is stable. As a general rule, any damaged area which is bigger than the size of your hand is not considered a minor repair. Before undertaking minor repairs, be sure to follow all the precautions described previously for sampling asbestos material. Always wet the asbestos material using a fine mist of water containing a few drops of detergent. Commercial products designed to fill holes and seal damaged areas are available. Small areas of material, such as pipe insulation, can be covered by wrapping a special fabric, such as re-wettable glass cloth, around it. These products are available from stores (listed in the telephone directory under "Safety Equipment and Clothing") which specialize in asbestos materials and safety items. Removal is usually the most expensive method and, unless required by state or local regulations, should be the last option considered in most situations. This is because removal poses the greatest risk of fiber release. However, removal may be required when remodeling or making major changes to your home that will disturb asbestos material. Also, removal may be called for if asbestos material is damaged extensively and cannot be otherwise repaired. Removal is complex and must be done only by a contractor with special training. Improper removal may actually increase the health risks to you and your family. Asbestos Professionals: Who Are They and What Can They Do? Asbestos professionals are trained in handling asbestos material. The type of professional will depend on the type of product and what needs to be done to correct the problem. You may hire a general asbestos contractor or, in some cases, a professional trained to handle specific products containing asbestos. Asbestos professionals can conduct inspections, take samples of suspected material, assess its condition, and advise on the corrections that are needed, as well as who is qualified to make these corrections. Once again, material in good condition need not be sampled unless it is likely to be disturbed. Professional correction or abatement contractors repair and remove asbestos materials. Some firms offer combinations of testing, assessment and correction. A professional hired to assess the need for corrective action should not be connected with an asbestos-correction firm. It is better to use two different firms so that there is no conflict of interest. Services vary from one area to another around the country. The federal government offers training courses for asbestos professionals around the country. Some state and local governments also offer or require training or certification courses. Ask asbestos professionals to document their completion of federal or state-approved training. Each person performing work in your home should provide proof of training and licensing in asbestos work, such as completion of EPA-approved training. State and local health departments or EPA regional offices may have listings of licensed professionals in your area. If you have a problem that requires the services of asbestos professionals, check their credentials carefully. Hire professionals who are trained, experienced, reputable and accredited -- especially if accreditation is required by state or local laws. Before hiring a professional, ask for references from previous clients. Find out if they were satisfied. Ask whether the professional has handled similar situations. Get cost estimates from several professionals, as the charges for these services can vary. Though private homes are usually not covered by the asbestos regulations that apply to schools and public buildings, professionals should still use procedures described in federal or state-approved training. Homeowners should be alert to the chance of misleading claims by asbestos consultants and contractors. There have been reports of firms incorrectly claiming that asbestos materials in homes must be replaced. In other cases, firms have encouraged unnecessary removal or performed it improperly. Unnecessary removal is a waste of money. Improper removal may actually increase the health risks to you and your family. To guard against this, know what services are available and what procedures and precautions are needed to do the job properly. In addition to general asbestos contractors, you may select a roofing, flooring or plumbing contractor trained to handle asbestos when it is necessary to remove and replace roofing, flooring, siding or asbestos-cement pipe that is part of a water system. Normally, roofing and flooring contractors are exempt from state and local licensing requirements because they do not perform any other asbestos-correction work. Asbestos-containing automobile brake pads and linings, clutch facings and gaskets should be repaired and replaced only by a professional using special protective equipment. Many of these products are now available without asbestos. If you hire an InterNACHI® inspector who is trained in asbestos inspection:
If you hire a corrective-action contractor:
Do not dust, sweep or vacuum debris that may contain asbestos. These actions will disturb tiny asbestos fibers and may release them into the air. Remove dust by wet-mopping or with a special HEPA vacuum cleaner used by trained asbestos contractors. by Nick Gromicko, CMI® Carbon monoxide (CO) is a colorless, odorless, poisonous gas that forms from incomplete combustion of fuels, such as natural or liquefied petroleum gas, oil, wood or coal. Facts and Figures
When CO is inhaled, it displaces the oxygen that would ordinarily bind with hemoglobin, a process the effectively suffocates the body. CO can poison slowly over a period of several hours, even in low concentrations. Sensitive organs, such as the brain, heart and lungs, suffer the most from a lack of oxygen. High concentrations of carbon monoxide can kill in less than five minutes. At low concentrations, it will require a longer period of time to affect the body. Exceeding the EPA concentration of 9 parts per million (ppm) for more than eight hours may have adverse health affects. The limit of CO exposure for healthy workers, as prescribed by the U.S. Occupational Health and Safety Administration, is 50 ppm. Potential Sources of Carbon Monoxide Any fuel-burning appliances which are malfunctioning or improperly installed can be a source of CO, such as:
CO Detector Placement CO detectors can monitor exposure levels, but do not place them:
How can I prevent CO poisoning?
Ten Tips to Speed Up Your Home Inspection
Speed up your home sale by preparing your home ahead of time using the following tips. Your home inspection will go smoother, with fewer concerns to delay closing. 1. Confirm that that the water, electrical and gas services are turned on (including pilot lights). 2. Make sure your pets won't hinder your home inspection. Ideally, they should be removed from the premises or secured outside. Tell your agent about any pets at home. 3. Replace burned-out light bulbs to avoid a "light is inoperable" report that may suggest an electrical problem. 4. Test smoke and carbon monoxide detectors, and replace dead batteries. 5. Clean or replace dirty HVAC air filters. They should fit securely. 6. Remove stored items, debris and wood from the foundation. These may be cited as "conducive conditions" for termites. 7. Remove items blocking access to HVAC equipment, electrical service panels, the water heater, attic and crawlspace. 8. Unlock any locked areas that your home inspector must access, such as the attic door or hatch, the electrical service panel, the door to the basement, and any exterior gates. 9. Trim tree limbs so that they're at least 10 feet away from the roof. Trim any shrubs that are too close to the house and can hides pests or hold moisture against the exterior. 10. Repair or replace any broken or missing items, such as doorknobs, locks or latches, windowpanes or screens, gutters or downspouts, or chimney caps. Checking these areas before your home inspection is an investment in selling your property. Better yet, have your InterNACHI inspector ensure that your home is Move-In Certified™. Your real estate agent will thank you! Electrical Safety
Electricity is an essential part of our lives. However, it has the potential to cause great harm. Electrical systems will function almost indefinitely, if properly installed and not overloaded or physically abused. Electrical fires in our homes claim the lives of 485 Americans each year and injure 2,305 more. Some of these fires are caused by electrical system failures and appliance defects, but many more are caused by the misuse and poor maintenance of electrical appliances, incorrectly installed wiring, and overloaded circuits and extension cords. Some safety tips to remember:
Electrical Panels Electricity enters the home through a control panel and a main switch where one can shut off all the power in an emergency. These panels are usually located in the basement. Control panels use either fuses or circuit breakers. Install the correct fuses for the panel. Never use a higher-numbered fuse or a metallic item, such as a penny. If fuses are used and there is a stoppage in power, look for the broken metal strip in the top of a blown fuse. Replace the fuse with a new one marked with the correct amperage. Reset circuit breakers from "off" to "on." Be sure to investigate why the fuse or circuit blew. Possible causes include frayed wires, overloaded outlets, or defective appliances. Never overload a circuit with high-wattage appliances. Check the wattage on appliance labels. If there is frayed insulation or a broken wire, a dangerous short circuit may result and cause a fire. If power stoppages continue or if a frayed or broken wire is found, contact an electrician. Outlets and Extension Cords Make sure all electrical receptacles or outlets are three-hole, grounded outlets. If there is water in the area, there should be a GFCI or ground-fault circuit interrupter outlet. All outdoor outlets should be GFCIs. There should be ample electrical capacity to run equipment without tripping circuit breakers or blowing fuses. Minimize extension cord use. Never place them under rugs. Use extension cords sparingly and check them periodically. Use the proper electrical cord for the job, and put safety plugs in unused outlets. Electrical Appliances Appliances need to be treated with respect and care. They need room to breathe. Avoid enclosing them in a cabinet without proper openings, and do not store papers around them. Level appliances so they do not tip. Washers and dryers should be checked often. Their movement can put undue stress on electrical connections. If any appliance or device gives off a tingling shock, turn it off, unplug it, and have a qualified person correct the problem. Shocks can be fatal. Never insert metal objects into appliances without unplugging them. Check appliances periodically to spot worn or cracked insulation, loose terminals, corroded wires, defective parts and any other components that might not work correctly. Replace these appliances or have them repaired by a person qualified to do so. Electrical Heating Equipment Portable electrical heating equipment may be used in the home as a supplement to the home heating system. Caution must be taken when using these heating supplements. Keep them away from combustibles, and make sure they cannot be tipped over. Keep electrical heating equipment in good working condition. Do not use them in bathrooms because of the risk of contact with water and electrocution. Many people use electric blankets in their homes. They will work well if they are kept in good condition. Look for cracks and breaks in the wiring, plugs and connectors. Look for charred spots on both sides. Many things can cause electric blankets to overheat. They include other bedding placed on top of them, pets sleeping on top of them, and putting things on top of the blanket when it is in use. Folding the blankets can also bend the coils and cause overheating. Children Electricity is important to the workings of the home, but can be dangerous, especially to children. Electrical safety needs to be taught to children early on. Safety plugs should be inserted in unused outlets when toddlers are in the home. Make sure all outlets in the home have face plates. Teach children not to put things into electrical outlets and not to chew on electrical cords. Keep electrical wiring boxes locked. Do not allow children to come in contact with power lines outside. Never allow them to climb trees near power lines, utility poles or high tension towers. Electricity and Water A body can act like a lightning rod and carry the current to the ground. People are good conductors of electricity, particularly when standing in water or on a damp floor. Never use any electrical appliance in the tub or shower. Never touch an electric cord or appliance with wet hands. Do not use electrical appliances in damp areas or while standing on damp floors. In areas where water is present, use outlets with GFCIs. Shocks can be fatal. Animal Hazards Mice and other rodents can chew on electrical wires and damage them. If rodents are suspected or known to be in the home, be aware of the damage they may cause, and take measures to get rid of them. Outside Hazards There are several electrical hazards outside the home. Be aware of overhead and underground power lines. People have been electrocuted when an object they are moving has come in contact with the overhead power lines. Keep ladders, antennae, kites and poles away from power lines leading to the house and other buildings. Do not plant trees, shrubs or bushes under power lines or near underground power lines. Never build a swimming pool or other structure under the power line leading to your house. Before digging, learn the location of underground power lines. Do not climb power poles or transmission towers. Never let anyone shoot or throw stones at insulators. If you have an animal trapped in a tree or on the roof near electric lines, phone your utility company. Do not take a chance of electrocuting yourself. Be aware of weather conditions when installing and working with electrical appliances. Never use electrical power tools or appliances with rain overhead or water underfoot. Use only outdoor lights, fixtures and extension cords. Plug into outlets with a GFCI. Downed power lines are extremely dangerous. If you see a downed power line, call the electric company, and warn others to stay away. If a power line hits your car while you are in it, stay inside unless the car catches fire. If the car catches fire, jump clear without touching metal and the ground at the same time. MORE SAFETY PRECAUTIONS :
by Nick Gromicko, CMI®
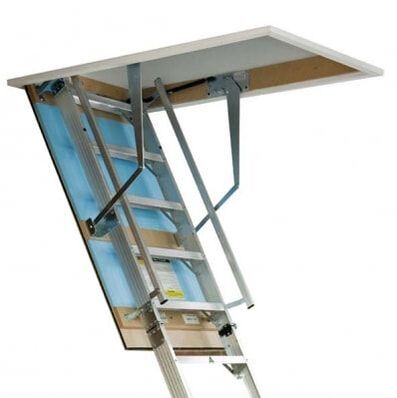
Attic pull-down ladders, also called attic pull-down stairways, are collapsible ladders that are permanently attached to the attic floor. Occupants can use these ladders to access their attics without being required to carry a portable ladder. Common Defects Homeowners, not professional carpenters, usually install attic pull-down ladders. Evidence of this distinction can be observed in consistently shoddy and dangerous work that rarely meets safety standards. Some of the more common defective conditions observed by inspectors include:
Relevant Codes The 2009 edition of the International Building Code (IBC) and the 2006 edition of the International Residential Code (IRC) offer guidelines regarding attic access, although not specifically pull-down ladders. Still, the information might be of some interest to inspectors. 2009 IBC (Commercial Construction): 1209.2 Attic Spaces. An opening not less than 20 inches by 30 inches (559 mm by 762 mm) shall be provided to any attic area having a clear height of over 30 inches (762 mm). A 30-inch (762 mm) minimum clear headroom in the attic space shall be provided at or above the access opening. 2006 IRC (Residential Construction): R807.1 Attic Access. Buildings with combustible ceiling or roof construction shall have an attic access opening to attic areas that exceed 30 square feet (2.8m squared) and have a vertical height of 30 inches (762 mm) or more. The rough-framed opening shall not be less than 22 inches by 30 inches, and shall be located in a hallway or readily accessible location. A 30-inch (762 mm) minimum unobstructed headroom in the attic space shall be provided at some point above the access opening. Tips that inspectors can pass on to their clients:
In summary, attic pull-down ladders are prone to a number of defects, most of which are due to improper installation. |
Details
AuthorWrite something about yourself. No need to be fancy, just an overview. Archives
October 2024
Categories |